
Wreck Thursday – The Bridge
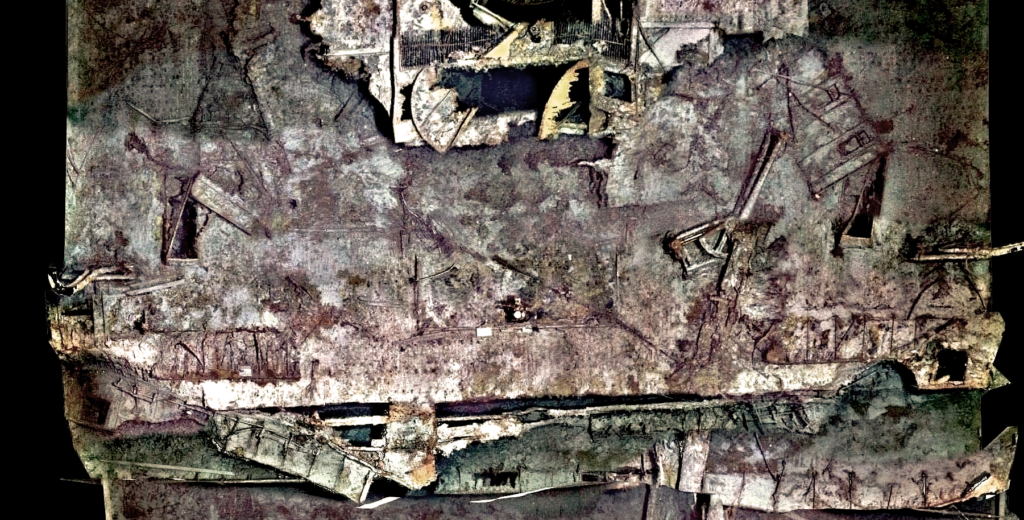
Wreck Thursday – The Bridge There are few more evocative locations on Titanic’s wreck than the remains of her Bridge. Watching the 1987 National Geographic documentary “Secrets of the Titanic,” filmed over 1985, 1986, and 1987, it is striking how Dr. Robert Ballard and those working with him believed that Titanic’s wreck would be far more intact. Ballard can be heard, while planning a dive, saying that he hoped to be able to “enter the Bridge” with his ROV Jason Jr. Of course, we now know that the Bridge is no longer an enclosed space as it was in 1912. While we can never be completely certain of exactly how the Bridge was destroyed during the bow section’s descent to the ocean floor, the pattern of the debris and the location of various parts of Bridge and its structural elements can give us some clues. t is likely that the foremast, which was swept backward and down as the ship plunged to the seabed, did some damage to the wooden roof and front of the Bridge, as well as potentially damaging the steel bulwark on which it now rests. Water rushing through the space may also have played some part in ripping away items inside. The real destructive force, however, appears to have been the downblast that resulted from the ship hitting the ocean floor with great force. This downward rush of water caused untold amounts of damage to the entire bow section, and it is likely that it completely destroyed the wooden structure of the Bridge, blasting it apart and downward. The debris of what was once the bridge tells at least some of the story of what happened to this space after it dipped below the surface. A mechanical linkage between the wheel on the Navigating Bridge and the telemotor in the Wheelhouse once ran along the ceiling of the Navigating Bridge. Today, it rests in a twisted mess on the floor of the Wheelhouse. Other structural elements are scattered on A-Deck below the Bridge. Had the rush of water swept the roof of the Bridge away, these items would be more likely found in the debris field somewhere astern of or away from the wreck itself. Instead, they lay close to where they were originally located. Today, there are two readily-recognizable features of the Bridge visible on the wreck. One is the low lip formed by the teak baseboard of the Wheelhouse, providing us an outline of that space and giving us our bearings. Directly aft of this lip is one of the most photographed and iconic spots on the wreck: the bronze telemotor that once connected the wheels on the Bridge to the massive steering gear located under the poop deck. It is the only item of equipment on the Bridge today that remains exactly where it was in 1912, marking the location from which Quartermaster Robert Hichens tried desperately to turn the Titanic away from the iceberg. As such, it has become the most popular spot for visitors to the wreck to place a plaque in memory of those lost and marking their visit. These rest in a row along the teak baseboard that once formed the front of the Wheelhouse. A closer inspection of the area of the Bridge and the space around it reveals much more. Check out the images to tour some of these smaller finds. One of the engine order telegraphs from the Navigating Bridge now rests on the port side of A deck, the drum separated slightly from the base. This proximity, much like that of the mechanical linkage noted earlier, indicates that the bridge was mostly destroyed by the downblast and not entirely by the falling mast or the rushing water. This is from 1996. The telegraph was recovered shortly after. A black cable, either for electricity or for the Wheelhouse telephones, runs along the forward teak baseboard of the Wheelhouse. This is from 2003. The bronze telemotor stands in the foreground, and some of the numerous plaques can be seen there as well. Directly to the left of the telemotor and in the center of the image is the mechanical linkage mentioned earlier. This is from 2003. In the background on the right, a wall of the Chartroom and Pilot’s Cabin, located behind the Wheelhouse, is visible. The collapsed bulwark of the port bridge wing can be seen in the background of this image, with the officer’s stairwell to the right and the cranked out davit for the port side emergency boat and Collapsible D to the left. This is from 1996. The collapsed rear wall of the starboard bridge wing now rests next to the cranked-in davit for the starboard emergency boat and Collapsible C. The davit was cranked in to connect Collapsible A and launch it after it was freed from the top of the Officer’s Quarters, but Titanic took her final plunge before this could be done and the boat was washed off the deck. This is from 1996. From 2003, this image shows the telemotor once again, but just behind it and resting diagonally across the Wheelhouse floor is a rigging line from the fallen foremast. Today, this is tangled with the linkage which connected the wheelhouse and navigation bridge helms. Also of interest is the base of the telemotor, including the various cables running from it into the deck. Also from 2003, this image shows the collapsed bulwark and forward wall of the wing cab on the starboard side. The remains of the raised platform that once ran along the base of the bulwark to allow an officer to step up and look over it can be seen here, as can the remains of the bulwark that connected with the aft wall of the wing cab (upper right of the image). The window for the forward wall of the wing cab is at the far left. In these views of the remains of the Bridge found on A deck, there are many
Titanic Tours – The Bridge
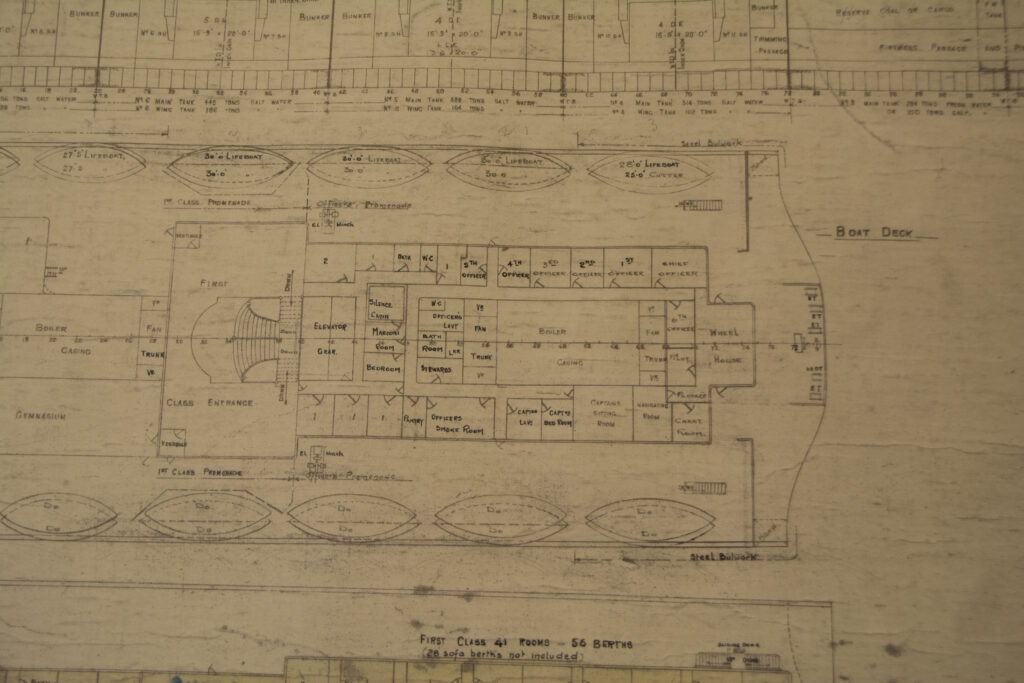
Titanic Tours – The Bridge A Titanic Connections Feature by Nicholas Dewitt The General Arrangement (GA) plans for the bridge area. These would be similar for both Olympic and Titanic, but Olympic was initially equipped with a curved-front Wheelhouse. Titanic’s was flat-fronted as presented here. The brain of any vessel at sea is her bridge. In the case of Titanic, the bridge is where some of the most consequential actions of 14 April 1912 occurred. This week, we’re heading there to take a look at this important space. Before we begin, a little historical note on the term “bridge.” Sailing vessels did not have a bridge, being instead navigated and commanded from the quarterdeck where the ship’s wheel could be found. But with the arrival of steam power and the equipping of ships with paddle boxes on their sides, the ship’s engineers needed a way to easily get from one paddle box to another and inspect the machinery. This took the form of a raised platform that stretched between the two boxes, forming a literal bridge. When paddles disappeared in favor of the screw propeller, the bridge stayed and became home to the ship’s command and navigating instruments. On the Olympic-class liners, as with other liners of the era, the bridge was located forward atop the superstructure. Denoted by a series of nine rectangular windows at the front center of the boat deck, the bridge encompassed a Navigating Bridge just behind the windows, an enclosed Wheelhouse situated behind that space, and encompassed the swept-back wings on either side that ended in a covered “cab” where officers could observe goings on below and to either side. We will explore all of these spaces in today’s tour. Connected to the Wheelhouse were a Chart Room, a Navigating Room, and quarters for a harbor pilot. We will explore these rooms at a later date. Navigating Bridge Each space above had a specific function to perform. Let’s begin with the Navigating Bridge. This space contained five order telegraphs, a wheel, and compass binnacle. There were also two small fold-down tables on either side wall that could be used for charts. While the wheel here was only manned when traveling near shore, the five telegraphs could and would be utilized to communicate with the various engine spaces throughout a voyage. The two outermost telegraphs were connected to the engine room to transmit orders for the speed of the ship. Each of the drums had an indicator for dead slow, slow, half astern, full astern, dead slow, slow, half ahead, full ahead, stop, stand by astern, and stand by ahead. The port handle of these telegraphs would transmit orders for the port engine and the starboard handle would do the same for the starboard engine. These two telegraphs were also connected to one another, so orders need only be “rung down” on one of the telegraphs. A third engine order telegraph was located directly to port of the wheel. This was the emergency telegraph. It had an independent connection to the engine room in case of the failure of the pair of main engine order telegraphs, but was otherwise the same in function. The two remaining telegraphs were for use when the ship was being docked or was near shore. These communicated with the Docking Bridge located on the poop. One was similar to the three engine order telegraphs, but would relay those commands to the Navigating Bridge from the Docking Bridge. The other had a dual set of commands on the side dials, one inner and one outer. Communicating both ways, the Navigating Bridge could send docking commands such as “Let Go Tug” or “Slack Away Stbd.” The Docking Bridge could also indicate information like “All Clear Stbd” or “Not Clear Stbd” to the Navigating Bridge. At the center of the Navigating Bridge stood the wheel and compass binnacle. The teak binnacle contained a 10” Kelvin-White compass. This was one of four main compasses aboard the Olympic-class ships, with the others being located in the Wheelhouse, a midships Compass Platform, and on the Docking Bridge. The compass inside the binnacle would have been lighted for easy viewing at night. Behind the compass binnacle was the ship’s wheel, one of three that could be used to steer the ship. This wheel, made of teak and measuring 3’ 9” in diameter, was mounted on a 34” high brass pedestal. This wheel was manned only when the ship was close to shore, but was connected to the telemotor in the Wheelhouse, which then connected it to the steering gear under the poop. The Navigating Bridge was fronted by nine large windows, with one of the ship’s bells mounted outside and above the center window. Two more windows opened out from the sides of the space, in line with the main engine order telegraphs. The General Arrangement (GA) plans for the bridge area. These would be similar for both Olympic and Titanic, but Olympic was initially equipped with a curved-front Wheelhouse. Titanic’s was flat-fronted as presented here. BRIDGE WINGS Accessed from the open sides of the Navigating Bridge were the two bridge wings, each with a steel bulwark swept back toward an overhanging bridge wing cab with windows on three sides. This area would be used for observation by officers on watch, providing an unobstructed view forward, to either side, and, thanks to the cab extending slightly over the side, downward to the sea. Immediately outside of the Navigating Bridge, nestled in the space where the bulwark met with the walls of the bridge, a pillar stood for use in mounting a pelorus. Also known as a “dumb compass,” a pelorus was used at times to take bearings. The pillar allowed it to be mounted above the bulwark for this purpose. Also of use in navigating the ship were the wing cabs, each of which was equipped with the sidelights used in navigation (red to port and green to starboard). These were designed so that they could each be
